PLEASE NOTE THAT THESE SCREENSHOTS ARE NOT AS CLEAR AS THE ORIGINALS ARE

This page goes into a detail of using KiCad, the free Windows and Linux application for designing printed circuit board (PCB) artwork. See my main KiCad page for a guide to using on KiCad.
On this page, we will look at using 3rd party libraries and modules, using a free set for Arduino design work as our example. Learning what is here should also help you with managing the libraries and modules where you store symbols and footprints you have created yourself.
We'll start by looking at some fundamental concepts.
We'll go through adding a library and module to give your KiCad installation some useful components for designing for Arduinos: schematics and footprints of empty Arduino shields.
Using PCB CAD tools, (aka EDA tools) generally follows the following pattern.
The "secret" of the process is data held inside the application which has graphical representations of the components which will go on the PCB, everything from the humble resistor up to fancy microprocessors. These representations come in two forms for each component. There's one version for showing the component on the schematic diagram of the circuit, and a second version showing the physical form of the component, for showing it on the design for the PCB.
That much is already pretty cool, but the big challenge for PCB design tools is keeping track of how the connection points to the component shown on the schematic symbol relate to the connection points on the footprint, i.e. the representation used for the PBC drawing.
(If the following doesn't make you say "Wow", you can ignore this paragraph.) This cleverness reaches its peak in the case of, say, a quad AND gate. It will look like four separate AND gates on the schematic, and yet look like one 14 pin DIL package on the PCB design. (End of bit you can "let go", if it doesn't make immediate sense to you. Back to work.)
In this page, I will try to show you how you can add to the extensive collection of symbols and footprints which come with KiCad as standard. There's always something new coming along, or something that the standard provisions don't take care of.
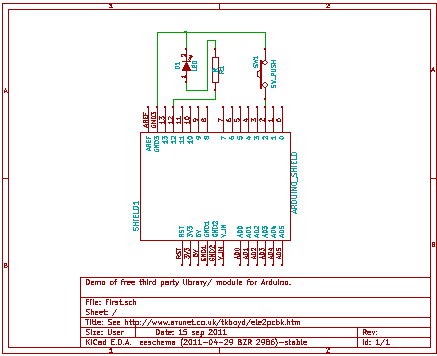
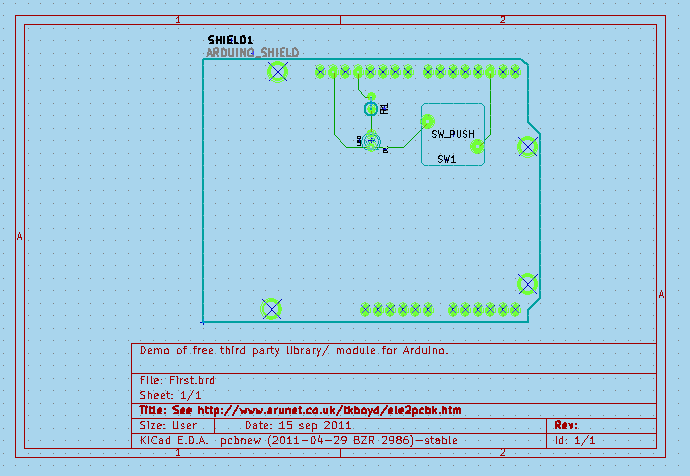
Here's a very little schematic and PCB design for a "shield"... something you could plug into an Arduino. It is only meant to show you some of the "goodies" in the free third party library and module, not be an argument for the virtues of EDA! The shield would give the Arduino an LED on the digital I/O pin "D12", and a momentary switch to "D2". There's the usual resistor for the LED. If D12 is taken high, the LED will glow, as the other end of that sub-circuit goes to the ground pin of the shield. There is no pull-up for the momentary switch because the Arduino has internal pull-ups which you can connect to I/O pins when you need them.


To create the schematic and PCB design above, once I'd installed the 3rd party Arduino material, only took adding the Arduino shield component to my schematic, a resistor, an LED, a switch, and then connecting them up, moving them about. (There's also the elements for putting an Arduino Mega shield in your design, too.)
All I had to add to my hard disk was the following two files...
arduino shieldsNCL.lib
arduino shields.mod
I fetched them from http://www.thingiverse.com/thing:9630 on 15 September 2011. Check the text on the page when you go there to see if maybe newer, better versions exist by then.
The "NCL" in the first file's name is for "Nicholas C Lewis" who created the files, to whom we are all indebted!
(I did not download the other two files, extensions .wrl and .wings. I presume they are for the people using KiCad's 3D visualization tools, one of whom I am not!)
There are two "secrets" to happy use of the material.
There are several places they could logically go. (Actually, they could, I think, go almost anywhere on your hard disk... but only a few places would be sensible.
Some would say: "Put all the KiCad support stuff in with the main KiCad installation". The installation even has places which seem designed for this.
I, however, find that when you follow that philosophy it can lead to tears. Eventually, you will have to reinstall your KiCad someplace new, or at least "disturb" your installation with an upgrade of the core files. I think it pays to keep "basic" files and "add-ons" separate, if you can... and I think KiCad is well written, in that I think it lets you put things like the Arduino add-ins where you want them.
I have a "KiCad" folder in my Windows "MyDocuments" folder. This is primarily for my board design files. However, I added a folder just below "MyDocuments/KiCad" called "3rdPLibsNMods" ("3rd party libraries and modules". I also created a "TKBLibsNMods"... "TKB" is me.
These folders will be where I keep what the name says. Backing up becomes easier. Knowing what is "basic" and what is "add-on" becomes easier. And thanks to the good design of KiCad, the things in those folders are entirely useable. At the moment, I can only offer you a somewhat clumsy way to use them... but I have a strong feeling that the most annoying aspects of what I propose are unnecessary... that if I just understood KiCad more thoroughly, the "problems" would go away, leaving just the advantages of my choice of where to store the libraries and modules I add.
Oh! By the way: Why libraries and modules? (Library: File with extension ".lib". Module: File with extension ".mod") I'm pretty sure that the library files store the information on the schematic symbols available to you as you proceed to build your design, and that the module files hold the PCB footprint data. Note: A cleverness of KiCad means that one schematic can serve multiple footprints. For instance, if you had two different single pole, single throw switches, a small one and a large one, perhaps, they could both use the same schematic but have individual footprints. I think the opposite applies, too. KiCad, for instance, only needs one 14-pin DIL footprint, even though many, many components come in such a package. The really clever bit comes with the mapping of the connection points on the schematic symbol to the pads on the footprint. I must confess that I'm not quite sure yet how that is managed, internally. I think it may be through entries in the project's main ".pro" file.
So that's where you can put the files. Alternatively, I would suggest in...
C:\ProjectFiles\KiCad\share\library\contrib\arduino shieldsNCL.lib
C:\ProjectFiles\KiCad\share\modules\contrib\arduino shields.mod
When KiCad fires up, it opens with whatever you were working on last time already loaded. You can just continue working on that. Or you can re-open some other previously started project, or you can start a new project.
KiCad keeps track, in the project's main ".pro" file, I think, of things you have said, for that project, about where you want schematic symbols and PCB footprints to come from. For a new project, you are given a "standard" set, which you can revise.
KiCad does not presume to scan your whole disk, make every stored library and module available (underfoot!) for a given project.
If you want to use a library or module which is not part of the standard set, you have to tell KiCad. And here's how....
Taking our Arduino case as an example...
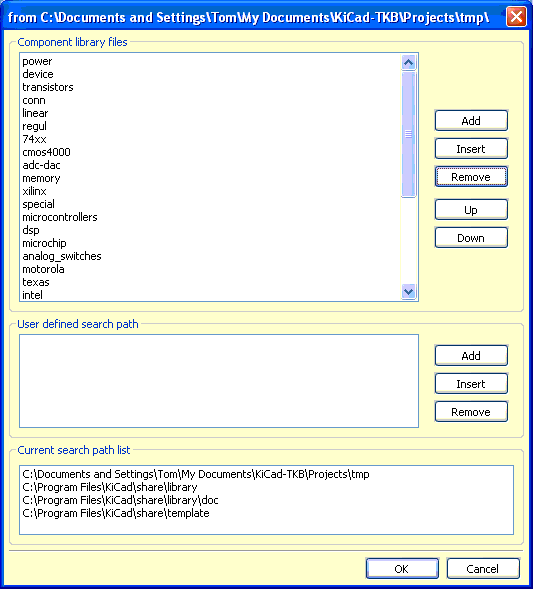
After once and for all putting arduino shieldsNCL.lib on my hard drive, in "MyDocuments/KiCad/3rdPLibsNMods", when I start a new project which will need the shield's schematic symbol, once, early in the project's life, while I have EESchema running, I have to use "Preferences | Library".
That opens a dialog....

Beware your intuition. I found that screen wasn't saying what I thought it was. It works well... when you use it as intended.
The top list "power, device..." shows you what libraries are already available to the designer. The order they appear in matters, too... but only when you become a more advance KiCad user. where a given library may reside, and even it's file name, cannot directly be determined from the screen above.... although a library listed there as "power" is probably saved in a file called "power.lib". (If you go off to explore this, don't be confused by the library "contrib.lib" and the folder called "contrib".)
Within each library there will usually be many schematic symbols defined. Not that you need it, but for the same of completeness, here's an extract from "device.lib". I believe it defines the "R" (for resistor) schematic symbol....
#
# R
#
DEF R R 0 0 N Y 1 F N
F0 "R" 80 0 50 V V C CNN
F1 "R" 0 0 50 V V C CNN
$FPLIST
 R?
 SM0603
 SM0805
 R?-*
 SM1206
$ENDFPLIST
DRAW
S -40 150 40 -150 0 1 12 N
X ~ 1 0 250 100 D 60 60 1 1 P
X ~ 2 0 -250 100 U 60 60 1 1 P
ENDDRAW
ENDDEF
The whole .lib file consists of such blocks.
We need to add the Arudino_ShieldsNCL.lib to the list. And here's the secret: Before we click "Add", next to that first pane, we need to add the path of the folder it is in to the "User Defined Search Path(s)" list. This is easy... just click the lower "Add" button (next to the "User defined..." section. That opens a browser, which lets us navigate to our folder. I used "absolute" path names, by the way.
The lower pane... "Current search path list"... gives us some search path options, in case one of the paths listed there fits out needs.. it would be a quicker way to specify where we wanted to look for .lib files when we click the "Add" next to the first list, the "Component..." list.I am hoping that there's a way to get...
MyDocuments/KiCad/3rdPLibsNMods
... to appear in that list at the start of a new project... but I haven't found the answer to that yet, and so must use the "User defined search path"/"Add (to user defined paths) approach for the moment. Hey... it works! And keeps things I've added to the system tidy.
Once we have added arduino shieldsNCL.lib to the libraries the project knows about, we can then when we are using the "Place component" tool, we can place an Arduino shield component in our schematic design.... either by...
So many ways to get it right? How did I manage to find so many wrong ways to try?
So! We've got the schematic for a shield onto our circuit diagram. In "the real world", we would then add a few more things, connect them up, move them about. For now, just add a resistor (Place an "R" component), and connect the two ends of it to any two connections on the Arduino shield.
Generate a netlist.
Invoke CVpcb.
Click on the R1 row. Over on the right hand side, you will get a list of possible footprints to be used by the component. The names are the names you'd expect from...
$FPLIST
 R?
 SM0603
 SM0805
 R?-*
 SM1206
$ENDFPLIST
... in the library definition of the "R" component... if you understand some wildcard rules. R?, for instance, says that R1, R2, R4 are acceptable. the R?-* makes R3-Large_Pads an option.
Those names... R1, R2, etc, are footprints defined in the .mod files available to the project. We can assign, say, the "R3-Large_Pads" footprint to the resistor called "R1" in the schematic (and the netlist). However, at the moment, there is no sensible footprint on offer when we come to try to assign a footprint on the PCB for the Arduino shield component of the schematic.
That's because we have not yet edited the lists of .mod files used by this project. Shut CVpcb for the moment. There's no point in saving the "net and component" list.
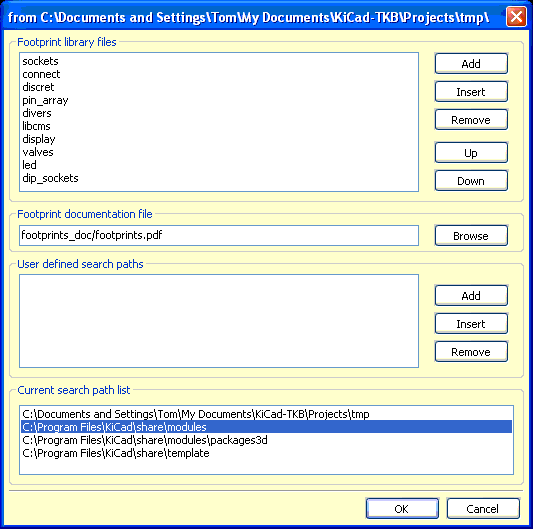
Launch PCBnew. Invoke (from the menu) "Preferences | Library". You'll get another dialog, similar to the one we had before, when we were adding .lib files to those the project will use. This time we have the dialog for adding .mod files....

This does for modules, what the other dialog does for libraries. Add....
arduino_shields.mod
... to the modules available to this project. As before, as you leave the "Add modules" dialog, you will be asked to re-save the project's .pro file.
Re-launch CVpcb. Assign the R3-Large Pads footprint to the design's resistor, and assign "Arduino_Shield"... the one WITH an underscore, not the other one, "Arduino Shield" without an underscore... to Shield1.
Save the "netlist and footprint" file.
Invoke PCBnew... and, hurrah!... you will be all set to read the netlist, design the board. (How to do those things is the subject of other tutorials... this one was to show you how to add the design elements you needed for Arduino work, as an illustration of the general principles.
If so, it would be good to hear from you. Which bits could be more clear? And do "feel free" to visit my freeware and shareware for windows site, below, please?....
![]() Page tested for compliance with INDUSTRY (not MS-only) standards, using the free, publicly accessible validator at validator.w3.org
Page tested for compliance with INDUSTRY (not MS-only) standards, using the free, publicly accessible validator at validator.w3.org